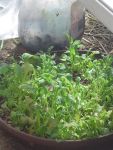
Seed starting is one of those jobs that requires me to sit still and do something repetitive. Normally, I like to keep moving and these kind of projects really drive me mad. But, for some reason I find this task very settling. I get the kids involved, we bring dirt inside and make a big mess on the hardwood floors. In the end, we end up with hundreds of seedlings that will later be transplanted into our garden and eventually bring us food. I think my kids enjoy seeing their food start from a seed and a dirt-covered floor as much as I do.
Over the years I’ve gone through the seed-starting process a few different ways. I’ve settled on one that works well for us each year. Here are the supplies we gather:
- Seed Starting Mix
- Plastic Trays and mini greenhouse covers, (like the “Jiffy” kind)
- Plastic greenhouse “cells”
- Spray Bottle
- Seeds
I’ve found that using seed starting mix is the very best ways to get the seedlings off to a good start. Other soils are made to hold water and can keep the soil too compact and too wet for optimal seed germination and early seedling growth. Although I’ve tried making my own starting pots I’ve found that the plastic cells, trays and mini greenhouse covers are easy, cheap and work fantastically for getting the seedlings off to a great start. I use these cells, trays and covers again and again for several years. The spray bottle is a great way to water the seeds in and to water the young seedlings as they grow. This is a task I give to my kids without fear because it is very difficult to over-water with a spray bottle!
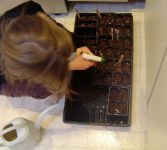
Here is the process we go through to get our seeds started. Again, its a process that we’ve worked out that seems to work well for our kids. I assign them each an age-appropriate task and let them go!
- Put seed starting mix in the cells (great for a toddler!)
- Put 2 or 3 seeds in each cell (an older child with better fine motor skills is best for this)
- Gently touch the seeds and lightly tap them into the soil
- Lightly sprinkle a little more seed starting mix on top
- Water the seeds in with a spray bottle
- Cover with the plastic cover, put in a sunny warm place, keep moist, (but not overly wet) and wait for the seedlings to emerge!
Once the seedlings are growing, tip the edge of the cover up with pencils or a ruler so they don’t get too warm. When they have grown a few leaves beyond their “first” leaves, take the cover off entirely. At this point we usually water from the bottom, pouring water in the tray as needed. It keeps the top of the soil from getting too wet which very easily leads to a fungus problem. Many plants will need to be transplanted into bigger pots at some point. We usually use big plastic cups with holes drilled in the bottom for drainage. We also use these cups year after year after year.
Below, some pictures of this years future garden plants.
-

- Seeds planted and marked with plastic knives
-
- My daughter watering in the seedlings with a spray bottle
-

- Lightly covering the seeds with seed starting mix
-
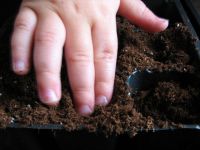
- My two-year-old gently tapping in the seeds
-

- My daughter putting pepper seeds in the cells
-

- Filling in the cells with seed starting mix (aka, playing with dirt in the house)